
Crop circles are a cultural phenomenon that has taken over areas of Europe by storm at several different times throughout recent history, though they take form in many areas of the world, with visual effects ranging from irregular shapes to amazing geometric patterns. The source of their formation and origin is surrounded by controversy, some say they are the product of UFO propulsion interference, others lay claim to the idea that they are naturally created phenomena, at the mercy of magnetic fault lines deep beneath the earths crust, but, as sure as there are many reasons for unexplained crop circles, there are some out there that have much more humane origins. Here’s a simple how to list for creating your own crop circle, and of course, adding to the mystery of strange patterns appearing in farmers fields overnight.
Steps
1- Use your head! In both Canada and the United States, it’s illegal to even enter a cultivated field, let alone to damage the crops. If you plan to make a crop circle, you best get permission from whomever owns the land first, lest you be enjoying the after glow from an 8×6 cell. An ideal choice is a field with a sloped hill that rises from a public vantage point (i.e. a road).
To ensure your circle can be seen from public areas (and has any chance of being noticed), plan your design according to the local gradient using a large scale elevation map.
2- Plot your straight-line or circular design. Mark on the map the directions you will be flattening, to avoid visible signs of passage (inexperienced circle makers can spoil a design by leaving stripes like a lawnmower would).
Initial access is normally found through existing farm tracks and trails, so note the position of them before you start. The basic gist is to avoid leaving any mark or evidence of your comings and goings from the site. Google Earth is an effective utility for scoping out the right location, and for understanding the run of any trails or traffic paths in the area.
3- It’s a smart idea to create your design entirely on computer, make amendments until you have the design you can be proud of and plan out the event according to that design. You will only have one shot at this, so put extra effort into planning and design. Unfortunately, practicing your design in the real world will ruin the surprise.
Start simple: consider making your first crop circle from an arrangement of discs in a geometric formation. More advanced curved lines can be created by overlapping partial circular arcs.
4- Equip each member with the equipment listed under Things You’ll Need.
5- Once in the field, use measurements to place markers exactly. Your friends can help you place markers, make line-of-sight calculations, and lay the rope to mark areas for flattening.
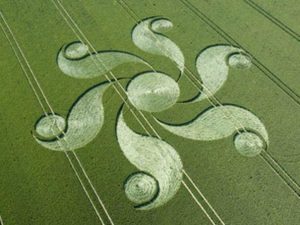
6- Make construction lines by laying rope outlines to shapes. Then flatten circles at the intersection points. To make the shown example formation, create a rope outline of an equilateral triangle, and create flattened circles at the triangle corners. Avoid flattening over the rope, to create an implied triangle.
7- There are two methods commonly used to flatten:
- Plank Flattening – use a roped plank to flatten by holding the rope or looping it over your shoulders. Press forwards and down by keeping one foot on the plank. Advance using a shuffling gait.
- Using a roller – some circle makers prefer using a light lawn roller (available from garden centers) to speed up flattening.
8- Keep on flattening until you have completed your design and have a really nice, well-made complex formation.
9- Wait for the media to spot the new formation. This may take several days, or you can speed the process by making an anonymous call. A good design will provide local newspapers with many column-inches of speculation.
Tips
- For best results you should probably spend more time planning the crop circle than actually making it. By carefully planning the design, working out what equipment is needed and discarding ideas that will be difficult or impossible to achieve, you can reduce the opportunity for embarrassing errors.
- Flatten during a dry period, to avoid churning up mud.
- Try to use the cover of night. Remember that ideally you should be finished by dawn, when you can take a picture of the pristine design before swarms of “croppies” come and trample all over it.
- To leave a ‘weird’ crop circle of cosmic origins:
- Bend some stalks around by exposing them to a blue light source for a few hours. Applying small amounts of natural gum or plaster will lock their new shape. Sadly this approach may not satisfy a detailed or scientific inspection
- Create swirled nests in the flattened areas by your clever weaving of stalks.Also, melt some iron filings into droplets on site and sprinkle them around the flattened area to leave ‘meteorite particles’ and magnetized stalks.
Warnings
- We are not suggesting, nor requesting or advocating in any way, that anyone should trespass on private property for the purposes of creating crop circles or for any other reason. Should you undertake to create a crop circle on property that is not your own, or for which you do not have permission to access, you do so of your own accord and consequence.
- Crop circle art is like graffiti for ‘cerealogists’, often undertaken without permission. Be careful, as not surprisingly, farmers do NOT want damage done to their property. Always operate within the law.
- The amount of crop flattened need not be excessive to make a strong impression of shape and form. In fact, you should not plan to flatten a larger area destructively, and it had better be beautiful or you can expect criticism and opposition.
- Remember to take away everything you brought to the site, including the soft drink bottles which are so easy to discard in the outlying field. These are a good way to distract onlookers from the beauty of your otherwise mysterious formation.
Things You’ll Need
- A light plank (4-6 feet in length) with a rope (10-12 feet) knotted through holes in each end. Alternatively, you may prefer to buy a light garden roller from a garden centre.
- A big ball of rope or nylon string (pre-stretched)
- Marking pole
- Protractor for measuring angles
- Measuring tape (100 ft)
- Night-vision goggles (optional)
- Laser-pointer to assist placing markers (optional)